Better date validation in Qualtrics


I have recently started learning Qualtrics as an alternative to ODK for online survey data collection. In general, I think it is a good platform with easy defaults and useful power-user features when the defaults break down. One example of that is the JavaScript API, which I used to add additional validation rules to date fields in my form.
Problem Statement
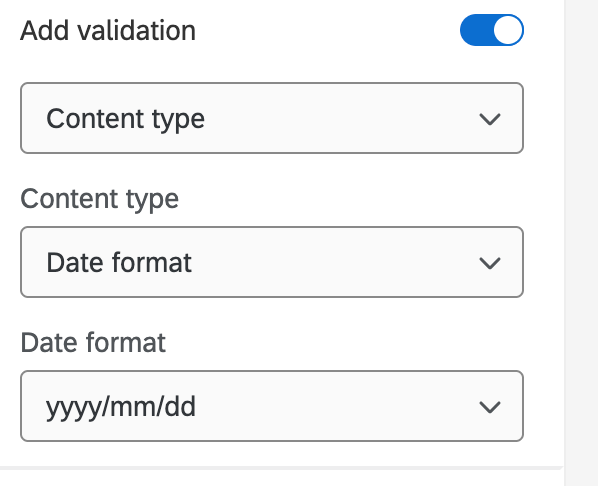
By default, Qualtrics will only validate dates are in the correct format, by adding a validation rule, selecting "content type" as "date", and then specifying the date format (e.g. "YYYY/MM/DD"). It looks something like this:
However, I have a form that requires a date range, with a defined start date and end date. One obvious rule to impose is that the start date should always be before the end date. However, there is no default "date range" content type in Qualtrics.
One alternative that seems popular is to use a date picker library. For example, University of Texas Austin recommends adding Flatpickr for date ranges. While this may work for some use cases, I, personally, find typing dates to be more efficient than clicking through a calendar. Adding libraries also comes with bandwidth overhead and may or may not provide a good i18n experience.
For reference, when using ODK, date validation is as simple as the constraint ${end_date} >= ${start_date}. Additional constraints can be added using the and keyword, and when combined with a required field, result in a powerful set of validation logic.
Using the JavaScript API for date validation
The Qualtrics JS API documentation has enough detail to get started but leaves a lot to be desired. For example, while there is a way to disable the "Next/Back" buttons on the web form, there isn't a clear way to set the validation state of inputs. Ideally, there would be some sort of setCustomValidity() hook, similar to native HTML inputs. However, using setCustomValidity() alone on the raw element does not prevent the Next/Back buttons from navigating through the form. This method also doesn't show a nice error message the way Qualtrics does by default. For reference, here is what the default failed validation looks like using the new form experience in Qualtrics.

Starting small: validating the date range
Breaking the problem up into smaller components, let's first try to set a minimum and maximum date for a date of birth question. For example, it is unlikely that someone currently working was born before January 1st, 1900, so let's try to enforce this rule using the Qualtrics Javascript API. This question will be required (forced response) and have the "content type" of date. Here is what that input might look like, if we use the format YYYY/MM/DD:

Great! So now we need to add validation using the Qualtrics API.
First, we'll add a callback to trigger the validation using the Qualtrics.SurveyEngine.addOnReady() function. This callback will make sure the user-inputted date value falls between January 1st, 1900 and today.
// NOTE: you must be using the "new survey experience" for these
// selectors to be valid.
Qualtrics.SurveyEngine.addOnReady(function() {
    // figure out what the question ID is and compute the CSS selector
	const qId = this.questionId;
    // grab the only <input> that is a child of the question id.
	const selector = '#question-'.concat(qId, ' input');
	const input = document.querySelector(selector);

	// our default lower bound is January 1st, 1900.
	const start = new Date('1900-01-01');
	const end = new Date();

	function validateDateRange() {
        // grab the entered data value.
		const date = new Date(input.value);
        // check if it falls between the start and end dates.
		const isValid = (date >= start && date <= end);

		if (isValid) {
			console.log('Validation passed!');
		} else {
			console.log('Validation failed!');
		}
	}

    // bind the event listener to the input.
    input.addEventListener('change', validateDateRange);
});
This is a decent start. The above code dynamically computes the question ID, and binds an event listener to it, which runs every time the input changes. For a date input, this happens when the element loses focus, meaning that the user clicks someplace else on the page.
Now that we have our initial scaffolding in place, we need to figure out what action to take when the validation passes and fails. Ideally, when the validation fails, we'd like:
- The input box to be colored red.
- Some error text to appear informing the user of the error.
- The form to disallow further progress or submission until the error is fixed.
The first two of these require manipulating the page HTML. The third will involve telling Qualtrics to disable the back button.
Blocking form progression on validation failure
We'll tackle the third option first since it is conceptually easier. Unfortunately, Qualtrics doesn't provide an easy way for us to mark a question as "invalid" and let the SurveyEngine know that validation failed. Instead, we'll be using the Javascript Question API to call disableNextButton() when validation fails and enableNextButton() when validation passes. We'll modify the validateDateRange() function like so:
function validateDateRange() {
    // grab the entered data value.
	const date = new Date(input.value);
    // check if it falls between the start and end dates.
	const isValid = (date >= start && date <= end);

	if (isValid) {
		this.enableNextButton();
	} else {
		this.disableNextButton();
	}
}

// becuase we need access to the `this` object in the validateDateRange()
// function, we need to bind it.
input.addEventListener('change', validateDateRange.bind(this));
Validation now corrected disables and enables survey navigation based on state.
You'll notice one extra addition above - the addition of .bind(this) to the addEventListener() call. The Qualtrics API doesn't make it clear, but the enableNextButton() and disableNextButton() are defined on the Question API, not as a property of the overall survey engine. The question is bound to this, so we need to pass a reference to this into the validateDateRange() function. We could also have used a variable such as var self = this; or a similar trick, but I prefer .bind().
Custom error styling and messages
Now we get to the most brittle part of the setup: we need to make custom styles for errors and add in a custom message. We'll do this by calling two custom functions:setErrorOnQuestion(id, validationMsg) and unsetErrorOnQuestion(id). The former will set all the error styles and add in the validationMsg below the input, while the latter will remove all the validation errors that we've added. Note that if an existing error is applied to the input (e.g., a required field), we would like unsetErrorOnQuestion(id) to ignore the existing error and only deal with errors we have set ourselves.
As a starting point, I used the browser console to copy a validation failure from a separate input - the minimum number of characters seen in the home address input image above. This ensures that the style will be the same across different input types.
Let's start with setErrorOnQuestion(id, validationMsg). The high-level logic is that it should look up the input based on the question identifier (id), set the appropriate error styles, and add in the validationMsg below the input. Here is the code:
// NOTE: this requires us to be using the "new form experience" for these
// selectors to work correctly.
function setErrorOnQuestion(questionId, validationMsg) {
	const id = '#question-'.concat(questionId);

	// grab the external wrapper div that should be wrapped in red.
	const wrapper = document.querySelector(id.concat(' > div'));

	// check if the error class is set.  If not, set it to make the question outline red
	const wrapperClass = wrapper.getAttribute('class');
	if (!wrapperClass.includes(' error')) {
		wrapper.setAttribute('class', wrapper.getAttribute('class').concat(' error'))
	}

	// the individual input should be wraped in red, if it isn't already.
	const input = document.querySelector(id.concat(' input'));
    const inputClass = input.getAttribute('class');
	if (!inputClass.includes(' inline-validation')) {
		input.setAttribute('class', input.getAttribute('class').concat(' inline-validation'))
	}

	// now add in the validation message.

	// first check that there isn't a custom validation error message already in place and remove it.
	const prevValidation = document.querySelector(id.concat(' .tcs-custom-error'));
	if (prevValidation) { prevValidation.remove(); }

	// We are piggy-backing off the "minimum character limits" class validation
	// for this rendering to fit with whatever theme is being used.
	input.insertAdjacentHTML('afterend', '<div class="char-limits tcs-custom-error"><span class="char-minimum">'.concat(validationMsg, '</span></div>').trim());
}
The code is pretty self-explanatory. The wrapper object is the bounding box of the question that we want to color red by setting the error class on it. The input is the question <input> that we wish to color red by setting the inline-validation class on it, which I copied from the minimum characters input validation. Finally, we aim to add in a new element that contains the error message using input.insertAdjacentHTML().
I added the tcs-custom-error class to the error message to allow me to find it and remove it when we rerun validation on the input. Otherwise, we may have the same validation message repeated multiple times underneath the input!
Now that we have setErrorOnQuestion() written, unsetErrorOnQuestion() is trivial. We just need to undo everything we did previously:
function unsetErrorOnQuestion(questionId) {
	const id = '#question-'.concat(questionId);

	// grab the external wrapper div that should be wrapped in red and uncolor it.
	const wrapper = document.querySelector(id.concat(' > div'));
	wrapper.setAttribute('class', wrapper.getAttribute('class').replace(' error', '').trim())

	// remove the red outline from the input.
	const input = document.querySelector(id.concat(' input'));
	input.setAttribute('class', input.getAttribute('class').replace(' inline-validation', '').trim());

	// first check that there isn't a custom validation error message already in place and remove it.
	const prevValidation = document.querySelector(id.concat(' .tcs-custom-error'));
	if (prevValidation) { prevValidation.remove(); }
}
You'll notice this is very similar to the setErrorOnQuestion().
If you copy the above code, you must pay attention to the whitespace in the CSS selectors - we don't want to remove any class with error in it; we want to specifically remove the error class itself. To accomplish this, I prefix it with a space. Otherwise, you may replace parts of class names without realizing it.
Putting it all together
We've got all the components. Now we just need to put it all together. For completeness, below is the full code:
// NOTE: this requires us to be using the "new form experience" for these
// selectors to work correctly.
function setErrorOnQuestion(questionId, validationMsg) {
const id = '#question-'.concat(questionId);
// grab the external wrapper div that should be wrapped in red.
const wrapper = document.querySelector(id.concat(' > div'));
// check if the error class is set. If not, set it to make the question outline red
const wrapperClass = wrapper.getAttribute('class');
if (!wrapperClass.includes(' error')) {
wrapper.setAttribute('class', wrapper.getAttribute('class').concat(' error'))
}
// the individual input should be wraped in red, if it isn't already.
const input = document.querySelector(id.concat(' input'));
const inputClass = input.getAttribute('class');
if (!inputClass.includes(' inline-validation')) {
input.setAttribute('class', input.getAttribute('class').concat(' inline-validation'))
}
// now add in the validation message.
// first check that there isn't a custom validation error message already in place and remove it.
const prevValidation = document.querySelector(id.concat(' .tcs-custom-error'));
if (prevValidation) { prevValidation.remove(); }
// We are piggy-backing off the "minimum character limits" class validation
// for this rendering to fit with whatever theme is being used.
input.insertAdjacentHTML('afterend', '<div class="char-limits tcs-custom-error"><span class="char-minimum">'.concat(validationMsg, '</span></div>').trim());
}
function unsetErrorOnQuestion(questionId) {
const id = '#question-'.concat(questionId);
// grab the external wrapper div that should be wrapped in red and uncolor it.
const wrapper = document.querySelector(id.concat(' > div'));
wrapper.setAttribute('class', wrapper.getAttribute('class').replace(' error', '').trim())
// remove the red outline from the input.
const input = document.querySelector(id.concat(' input'));
input.setAttribute('class', input.getAttribute('class').replace(' inline-validation', '').trim());
// first check that there isn't a custom validation error message already in place and remove it.
const prevValidation = document.querySelector(id.concat(' .tcs-custom-error'));
if (prevValidation) { prevValidation.remove(); }
}
Qualtrics.SurveyEngine.addOnReady(function()
{
const qId = this.questionId;
const selector = '#question-'.concat(qId, ' input');
// grab the input
const input = document.querySelector(selector);
// helper function: return true if a date is valid.
const isValidDate = d => (d instanceof Date && !isNaN(d));
// helper function: format date object as yyyy/mm/dd
const fmtDate = dt => {
const y = dt.getFullYear();
const m = String(dt.getMonth() + 1).padStart(2, '0');
const dd = String(dt.getDate()).padStart(2, '0');
return ''.concat(y, '/', m, '/', dd);
};
// our default lower bound is January 1st, 1900.
const start = new Date('1900-01-01');
const end = new Date();
function validateDateRange() {
const date = new Date(input.value);
const isValid = (date >= start && date <= end);
if (isValid) {
unsetErrorOnQuestion(qId);
this.enableNextButton();
} else {
setErrorOnQuestion(qId, 'Error: the date must be between '.concat(fmtDate(start), ' and ', fmtDate(end), '.'));
this.disableNextButton();
}
}
// bind the event listener to the input.
input.addEventListener('change', validateDateRange.bind(this));
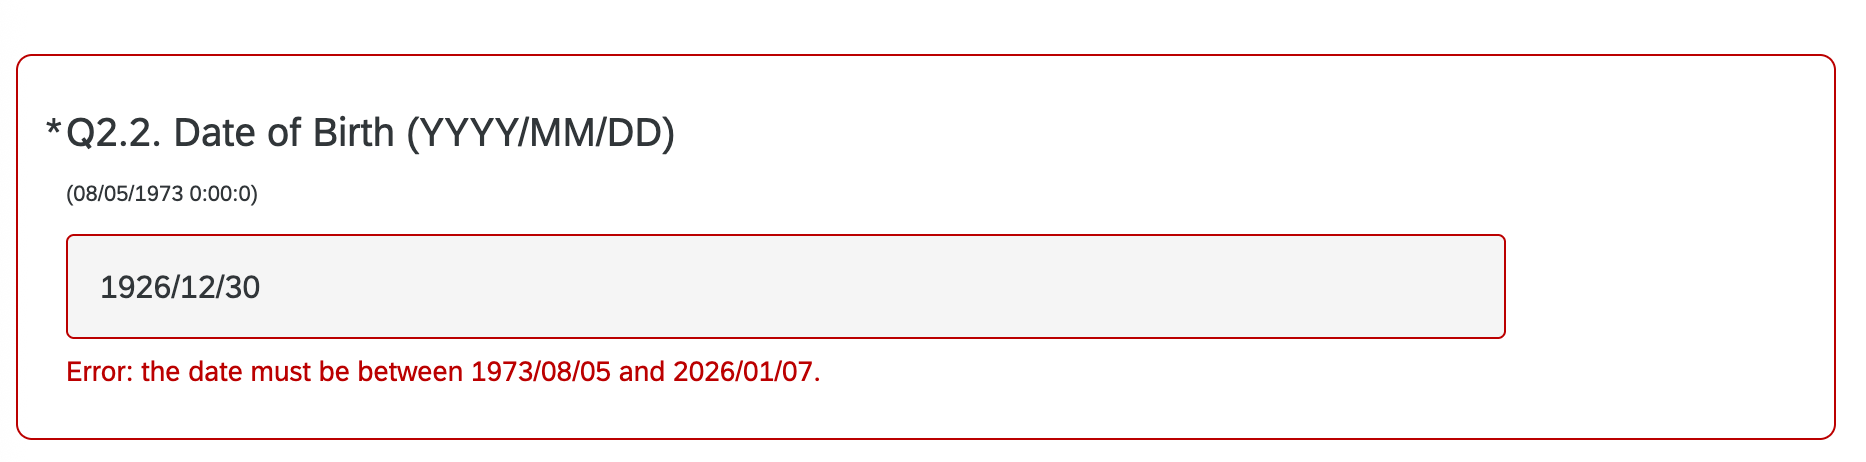
});I've included a few helper functions for checking correctness and formatting. The above code should produce something like this on failure (the minimum date I'm using for validation is in small print above the input).
Final thoughts
It's not the ideal solution for several reasons:
- If the user hits the back button and then the next button, the validation disappears. In this way, they could work around the minimum validation. We could try to put the logic in the
addOnLoad()function to validate the input on page entry, but this starts down the road of diminishing returns for me. - The display of messages and styles depends on using the "new form experience" to work properly. You can also make a similar idea work with the original form experience, but the CSS selectors would be entirely different.
I would much prefer if Qualtrics provided a solution to .setCustomValidity(message) on the form input itself. Or even just mark an input as invalid (e.g., this.setInvalid() to prevent submission/navigation on custom validation. Or perhaps include a min/max condition on dates, similar to min/maxes on numeric inputs.